Sunday, September 28, 2014

Sweet Potato Lasagna


I love the kind of meals where the leftovers taste just as good as the dish the night it was cooked. Well, lasagna is the perfect meal from which to achieve these perfect leftovers. Recently, I've been experimenting with different kinds of Lasagnas to try to make them healthier and more nutritious than the regular Italian version.

My mom became gluten-free a year and a half ago, and she came up with the idea of using corn tortillas instead of noodles. I love making Mexican Lasagna this way. Check out my recipe for that here.


I decided I wanted a carb-free layer in addition to the corn tortillas this time, and thought thin slices of zucchini would be perfect. After you thinly slice the zucchini, lay it on a paper towel and sprinkle it with salt to make sure you get out most of the liquid. Zucchini contains a lot of water so if you skip this step, your lasagna might be a little soggy. 

The sauce for this lasagna is by far the best part of the whole dish. It's made by roasting sweet potatoes and pureeing them with milk and chicken stock. The result is a velvet-y smooth sauce that accompanies the ground turkey and onion mixture PERFECTLY.

Sweet potatoes contain beta carotene which is an antioxidant that gives the potatoes their bright orange color. Beta-Carotene is said to prevent many different types of cancer. Sweet potatoes also contain Vitamin A which helps promote healthy eyesight as well as healthy skin and hair. Lastly, sweet potatoes are e a great source of potassium which helps lower blood pressure.


Ingredients:
2 sweet potatoes diced 
8 corn tortillas
1 onion- diced
3 cloves garlic- grated
1 lb. ground turkey
1.5 cups chicken stock
1 cup milk
2 zucchinis- thinly sliced, salted and patted dry. (read above directions)
1 cup part-skim ricotta
1 egg
2 cups spinach
1 cup shredded mozzarella
1 tbsp. olive oil
salt/pepper to taste
1/8 tsp. red pepper flakes

Directions:
1) Preheat oven to 425 degrees
2) Peel and dice the sweet potatoes and roast them for 25-35 minutes or until tender
3) Reduce oven temperature to 375 degrees. 
4) Add sweet potatoes to a food processor with salt/pepper, chicken stock and milk and puree until a silky smooth sauce appears. (Add more liquid if necessary)
5) Meanwhile, heat olive oil over medium high heat
6) Add onion and cook for 15-20 minutes or until caramelized 
7) Add ground turkey and heat until totally cooked through
8) Add garlic to turkey mixture with the red pepper flakes and more salt/pepper to taste. Mix around and taste for seasoning. Add more spices, if necessary.
9) Mix ricotta in a small bowl with the egg until completely incorporated
10) Spray a 9x13 pan with non-stick cooking spray
11) Pour 1/4 cup cold water on the bottom of the pan so the tortillas do not burn
12) To start building your lasagna, add corn tortillas to the bottom, top with half of the turkey mixture, and 1/3 of the sweet potato puree. Place zucchini strips on top and then add the ricotta mixture. Top ricotta mixture with the raw spinach leaves. Add the rest of the turkey mixture and more of the sweet potato purees. Line the top with the 4 remaining corn tortillas and pour the remainder of the sweet potato puree on top. 
12) Cover the lasagna with foil and cook for 30 minutes
13) Remove from oven and top with grated mozzarella cheese. Cook for additional 10 minutes uncovered.
14) Remove from oven and let sit for 20 minutes prior to eating so the lasagna stays together when you cut into it.


Sunday, September 21, 2014

My 1 Year Blogiversary!


It's hard to believe that it was was ONE year ago that I started the Superfoods Girl Blog! I started the blog with the goal of motivating people to eat healthier and incorporate heart-healthy superfoods into their every day diets. I truly believe I've been successful in this goal, and I look forward to sharing even more recipes with you.

You will notice the my blog got a face-lift. I owe that all to my extremely talented friend, Julia who spent time revamping my site and making it fancy. :)

To celebrate this Blogiversary, I have decided to post my top 5 favorite recipes of the year. If you haven't made these, I encourage you to give them all a try!

Recipe #5: Slow Cooker Apple Cinnamon Oatmeal
This is the most delicious and satisfying breakfast in the cooler months--especially in apple-picking season!


Need a sweet and healthy treat to satisfy your chocolate cravings? Look no further! Make these easy and scrumptious chocolate peanut butter banana bites.


Recipe #3: Protein Power Balls
These superfood-loaded treats are the perfect on-the-go snack to make you feel energized and ready to take on the day!


Obsessed with avocados like I am? Stop making the traditional olive oil-loaded pesto and use avocados instead! 

AND..my FAVORITE recipe this year... Recipe #1: Eggplant "Meat" Balls
This is my mom's famous recipe, and it is definitely a winner! Try introducing "Meatless Mondays" at your house. I guarantee you- nobody will miss the meat!


Thank you all for your support and for contuing to read my blog each week. Going into year #2, I feel more inspired than ever to create and share more delicious recipes with you!
~xoxo Emily


Sunday, September 7, 2014

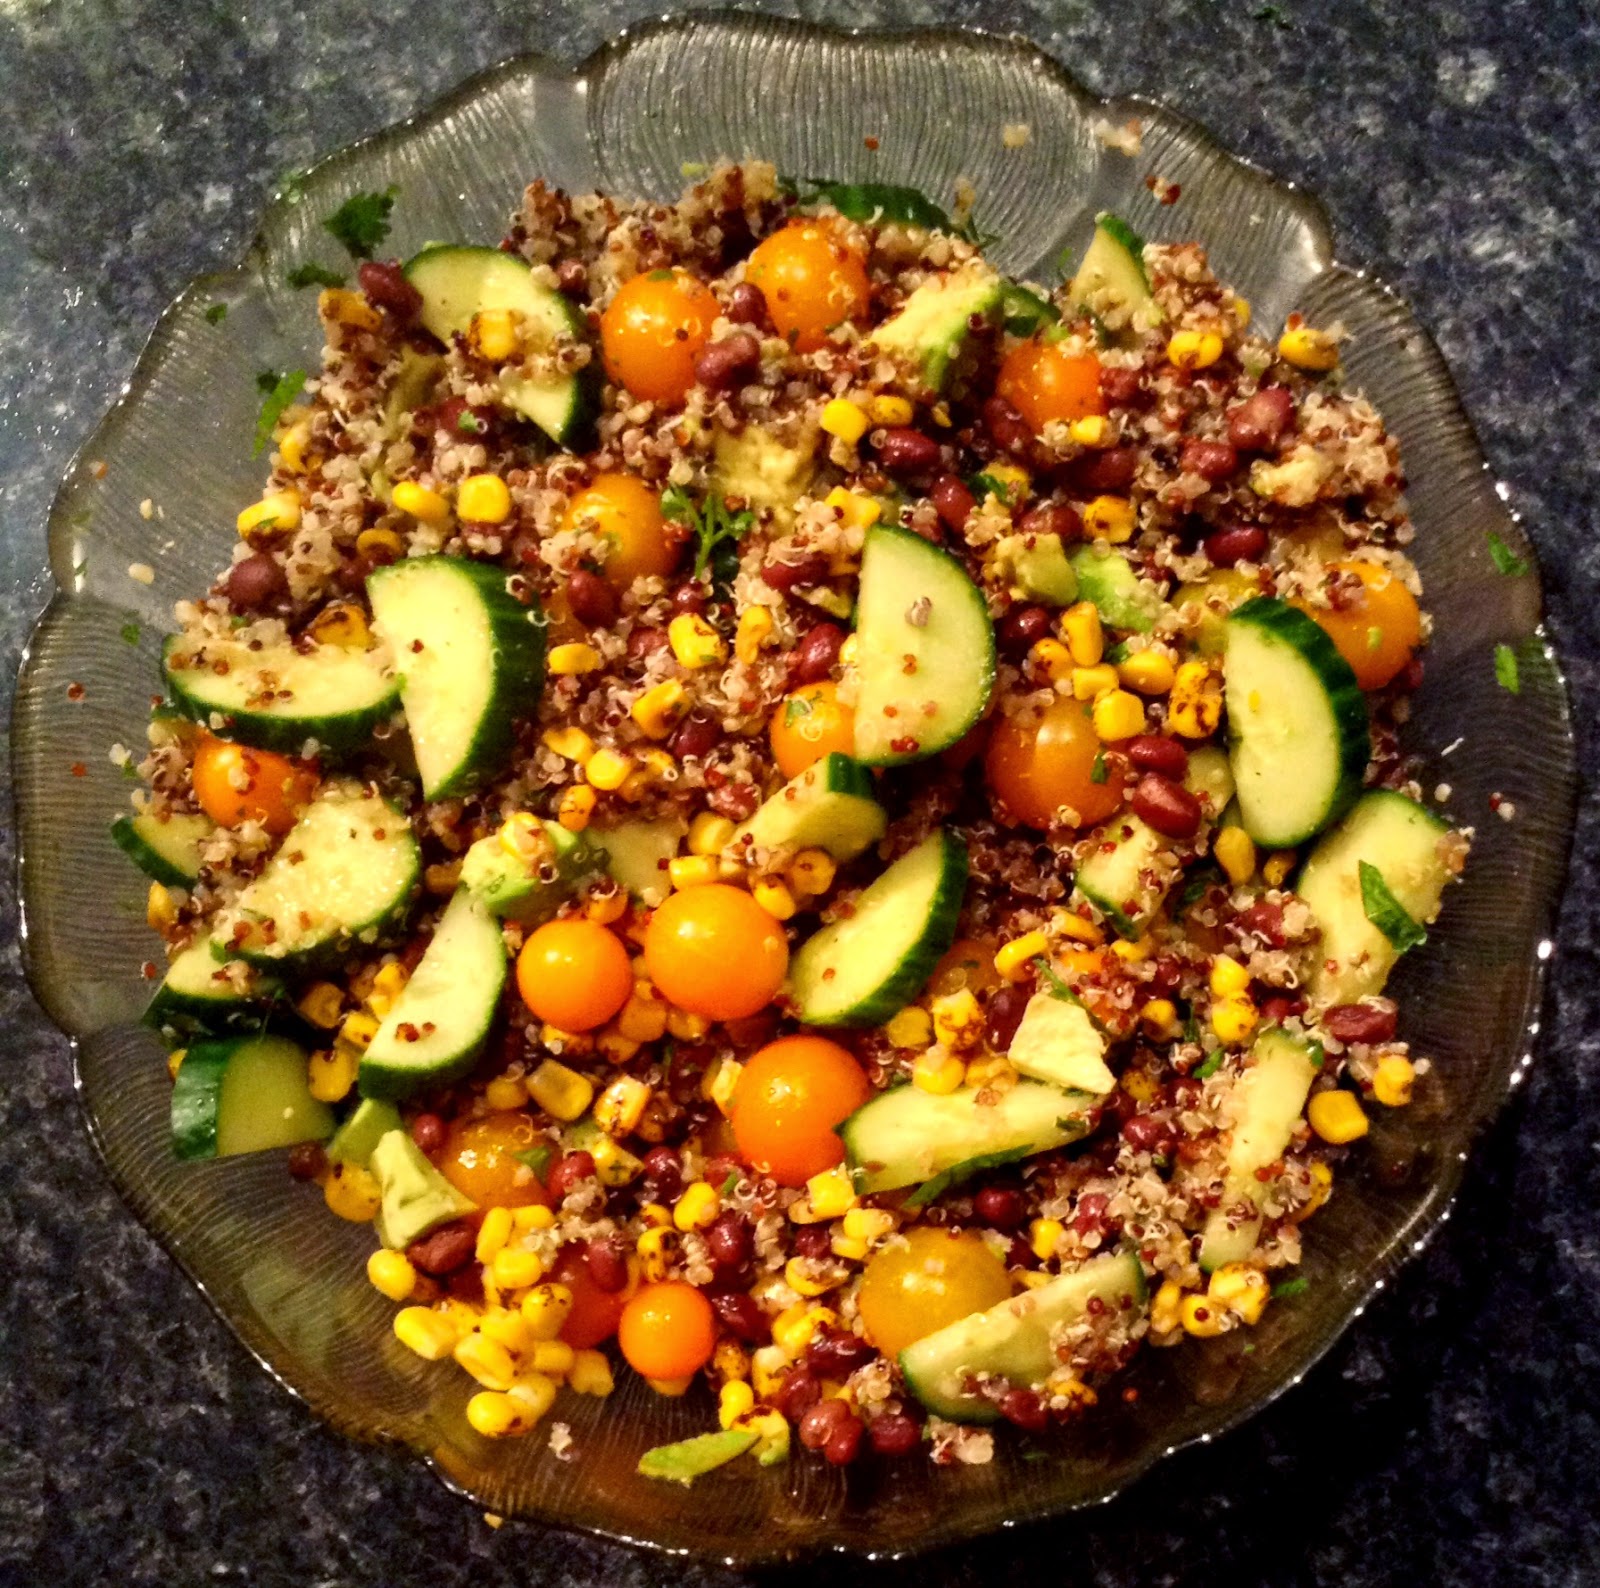
Fiesta Quinoa Avocado Salad


Every Sunday morning, my ritual is as follows: I drink my coffee, watch Food Network, and browse Pinterest to see what new and exciting lunch recipes were posted. 

I don't know if I've mentioned this before, but I get bored with food VERY quickly. I know there are some people (cough, my husband) who can eat the same thing for lunch every day and never get tired of it. Well, my friend, I am in no way like that. 

I like to think of lunch as my reward for getting through the morning at work. Therefore, I want this "reward" to be utterly delicious and refreshing to my palate! 

There are 4 qualities that are very important to me when it comes to lunches. I want:

  • A dish that's easy to make
  • A dish that doesn't require 800 ingredients 
  • A dish that's healthy and hearty (has enough protein to keep me full)
  • A dish that doesn't smell (like fish or curry- let's be honest, we hate the people who bring smelly lunches into work)


This dish was inspired by a Barefoot Contessa recipe that I saw on Food Network this morning. She made a delicious-looking corn and avocado salad that almost made me start drooling. I decided to sort of recreate this with my own flare. I used black beans and quinoa in my salad to amp up the protein and fiber to really keep me satisfied throughout the day. I also added cumin and paprika to give it a little zesty edge. 


In addition to being great for lunch, this salad is also the perfect dish to bring to a party or BBQ because it really adheres to most dietary restrictions: The salad is gluten free, dairy free, nut-free, and vegan! Could you ask for more?!

I used cilantro in this recipe, which I know a lot of people dislike. Feel free to sub this out with parsley or any other herb you love. I also found the most beautiful cherry tomatoes that I thought would be perfect for this salad, but you can use any kind of tomato you want. Lastly, I used black beans, but I think kidney beans or cannelini beans would also also work very well. Mix it up and have fun with this recipe!


My superfood of the week is quinoa which I've featured before in my Quinoa Fried "Rice." To get the health benefits of quinoa check out that recipe: Quinoa Fried "Rice"

Ingredients:
2 cups cherry tomatoes
1 cup dried quinoa
1 large english cucumber-sliced
1 can black beans- rinsed
1/2 cup cilantro-chopped
2 cups corn (I used frozen and thawed it prior to adding)
1 avocado- diced
1/4 cup balsamic vinegar
1/8 cup olive oil
2 limes- juiced
1/2 tsp sugar
1 tsp. sea salt
1/2 tsp. black pepper
1 tsp. cumin
1/2 tsp. paprika

Directions:
1) Cook quinoa to package instructions and let cool
2) Combine tomatoes, cucumber, beans, corn, cilantro, and avocado in large bowl
3) Mix vinegar, olive oil, lime juice, sugar, sea salt, pepper, cumin and paprika in a small bowl with a wire whisk. Add dressing to the veggie mixture
4) Add cooled quinoa to mixture and stir to combine
5) Taste for seasoning and add more salt/pepper if necessary
6) Refrigerate at least 2 hours before eating to allow flavors to marry


Sunday, August 31, 2014

Healthy Chocolate PB "Ice-cream"


It's Labor Day Weekend, and I just cannot believe how fast the summer has flown by. Seriously, it feels like July 4 was just yesterday! To celebrate the last real weekend of summer, I decided to treat myself to a refreshing bowl of "ice cream." 


I'm sure you've seen recipes before for the 2 ingredient "ice-cream," which is simply a frozen banana and peanut butter. I've made that and it's awesome, however today  I wanted to kick it up a notch.

I added some raw cacao powder to make the "icecream" chocolate-y. I also experimented adding Greek yogurt to give it the tang of froyo and make it a little more creamy and luxurious. The Greek yogurt also adds a healthy dose of protein making this the perfect snack to have post work-out!


Bananas are a superfood because they contain potassium which helps lower blood pressure and regulates sodium in the body. Bananas also contain soluble fiber which can reduce the risk of heart disease. Bananas can also help you feel energized with the healthy levels of carbohydrates and sugars they contain.


Ingredients:
1 frozen banana
1 tbsp. all natural creamy peanut butter
1/8 cup 2% Greek  Yogurt
1 tbsp. raw cacao powder
chocolate chips and peanuts for topping- optional

1) Add first 4 ingredients to food processor
2) Blend until creamy
3) Sprinkle toppings of your choosing and enjoy!
*Makes 1 serving

Monday, August 11, 2014

Mint and Watermelon Feta Salad


My inspiration for this post came from the huge mint plant that my father-in-law gave us a few weeks ago. I've been experimenting with new recipes involving the mint, and have obviously been making a TON of mojitos. ;) Today, I decided I would make a mint and watermelon salad because it sounded so refreshing on this hot and humid day.


Because it's almost halfway through the month of August already (sigh), I have been eating all of the delicious summer fruits like it's my job: strawberries, blueberries, plums, peaches, mango, watermelon...you name it!

I have always loved watermelon since I was a kid. In fact, this delicious fruit reminds me of summer camp when I would have a slice on a hot day and get the sticky pink juice all over my clothes. Yum!

This watermelon salad is extremely delicious and so easy to prepare. It's got a little bit of that salty/sweet thing going on with the sweet watermelon and the salty feta cheese. It's also got a little bit of crunch thanks to the cucumbers and great texture from the tomatoes. All in all, I must say, this is the perfect salad. Whip up a batch to bring to your next barbecue, make a big bowl for lunch this week, or serve it as a side dish to whatever you're cooking for dinner. 


Because watermelon is made up of 92% water, it helps to regulate the digestive system and keeps the body hydrated. Watermelon also contains the amino acid, circulline, which can help you exercise more intensely and prevent sore muscles after a workout. Watermelon is also great for your skin and hair as it provides Vitamin A which helps lock in moisture. 


Ingredients:
1/4 watermelon cubed
1/2 block feta cubed (about 4 oz.)
1/4 cup chopped mint leaves
1/2 English cucumber sliced
1/2 cup cherry tomatoes sliced in half
1 tbsp. olive oil
1 tbsp. balsamic glaze
1/4 tsp. sea salt

Directions:
1) Combine all ingredients  (watermelon through cherry tomatoes) in serving dish
2) Drizzle with olive oil and balsamic glaze
3) Sprinkle top with sea salt
4) Enjoy!
*Makes about 4 servings

Sunday, August 3, 2014

Protein Power Balls


I am pretty sure I've consumed my body weight in nut butter this weekend. ;) I made almond butter last week, cashew butter yesterday, and bought natural peanut butter from Whole Foods today. There are so many things you can do with nut butters. Make sandwiches, desserts, mix them into greek yogurt for a healthy breakfast, spread them on a banana or apple, or in this case, make protein power balls! I got the idea to make protein power balls from my Mom's friend, Carol. She brought them to a party we had a couple of weeks ago, and after I tried one, I knew I had to recreate them.

These make the perfect pre or post-workout snack, a yummy dessert for after dinner, or an easy on-the-go breakfast. 


These little babies are chewy and moist, salty and sweet at the same time, and just bursting with delicious flavor. What I love most about these protein power balls is the versatility. You can use any kind of nut butter you have on hand, and roll them in any kind of topping you want. In my recipe, I used the almond butter, cashew butter, and peanut butter I had in my pantry. For toppings I used chia seeds, chopped chocolate chips, and shredded coconut. Some other toppings you could try are dried cranberries, hemp seeds, sesame seeds or flax seeds. Believe me when I tell you, the possibilities are endless!

Oats are the superfood I chose to focus on in this recipe. Oats contain phytochemicals (plant chemicals) which are known to prevent many different cancers. Because oats contain soluble fiber, they can help reduce hypertension, or lower high blood pressure. Oats contain a fiber called beta glucan which is said to lower bad cholesterol and prevent heart attacks. 


Ingredients:
3 cups oats
1.5 cups nut butter
3 tbsp. honey/agave/maple syrup
2 tbsp. raw cacao powder (optional)
1/2 tsp. cinnamon (optional)
Toppings: I used 1/4 cup shredded coconut, 1/4 cup chopped chocolate chips, and 1/4 cup chia seeds

Directions:
1) Combine oats, nut butter, honey, cacao powder, and cinnamon (if using) in a mixing bowl
2) Wet hands with water and take tbsp of mixture and form into ball
3) Roll the ball in topping of choosing
4) Place protein power balls on a baking sheet sprayed with non-stick cooking spray
5) Refridgerate at least an hour before serving
*Recipe makes 24 protein power balls. 
*Keep refrigerated up to 3 weeks

Tuesday, July 29, 2014

Nori Bon Bons- Guest Blog from Mom!


Elyse-mom here....so honored to be guest blogging again. Seaweed is my favorite superfood, and always a crowd pleaser. Versatile, gorgeous, and fun to work with, I fell in love with seaweed long before the sushi craze of this millennium.

Obsessed with the many varieties, all colors, shapes, and sizes, I started buying packaged seaweed in local Asian food markets and Essene in center city Philadelphia back in the 70s. I love long, thick sheets of kombu, useful for making broth (dashi, the chicken stock of Japan), translucent but sturdy wakame leaves or thin sweet-tasting arame strands, soaked and seasoned with roasted sesame oil and rice wine vinegar for a delicious seaweed salad, and tangles of kelp, a great gluten-free pasta substitute.


Nori sheets, dark emerald green and shiny, are a delicious snack and fabulous wrap for other foods (e.g. sushi). In this recipe, I use them to wrap balls of sticky rice, as a snack, appetizer, or party food.

What makes seaweed a superfood, in addition to its extraordinary antioxidant properties, is the fact that it contains all the minerals required by the human body....calcium, sodium, potassium, magnesium, iron, iodine, and zinc. Any kind of rice can be used, although high starch varieties (basmati, short grain, or sushi rice) will hold together best and make the neatest and prettiest bon bons.


While I seasoned my purple sticky rice (from the Whole Foods bin) with only sea salt, feel free to add a bit of oil (sesame or coconut are particularly delicious), vinegar (white or rice wine recommended), or fresh lemon or lime juice. I garnished my bon bons with fresh lemon zest, but sesame seeds or finely chopped nuts would also lend a beautiful finish. Enjoy!


Ingredients:
1 package roasted nori seaweed (I use Trade Joe Seaweed Snack, $.99 per package
1 cup uncooked rice (brown or white Basmati or purple sticky rice are my favorites)
2 1/2 cups water
1/2 t. sea salt
lemon zest for garnish

Directions:
1) Rinse rice in three changes of water, and cook in salted water until tender (20 minutes for white or purple rice, 40 minutes for brown rice). 
2) Let rice cool slightly, then form into small balls and wrap in nori sheets. 
3) Garnish as desired.
*Recipe makes about 25 bon bons